Thursday, December 30, 2010

Matar Rice or Rice with Peas

Matar Rice can be prepared into so many ways. I have seen a Matar Pulao before and it has more color on the rice and the preparation was different. But this one that I have prepared, I just used a regular rice and not Basmati Rice. I also included not so much masala or spices into it. I just wanted to prepare it simple as possible without anything that I could get off the rice like cloves or cinnamon bark when eating.

Matar Rice or Rice Peas
matar rice2


Ingredients for Matar Rice:
cooked rice
green peas (fresh or canned)
chopped onion
chopped garlic
pinch of turmeric powder
pinch of salt
vegetable oil

Preparation/ Method for Cooking Matar Rice or Rice Peas:

Saute garlic and onion on a heated oil in pan. Put salt to your onion to cook the onions well and after this, you need to put the turmeric powder. This will give the color to your rice. It will depend on how much turmeric you would put, but as for me, I opted to put less of it. If your onion is well done, you may now put your green peas and be sure that your stove flame is in medium heat. After stirring the peas, put some amount of water. Not too much water, your objective here is just to make the peas tender. You can check the peas after 10-15 minutes or if you think that the water you put dissolved already.
After the water is gone and you have checked that your peas is now okay to eat, you can now include the cooked rice. Just stir the rice very well so that all the peas and the oil with turmeric will blend well in it. Best when serve hot and steaming.
Cooked Rice mixed with the sauteed green peas
matar rice1


Again as I have said, this dish would be more lovely if you have been so creative and brave to include chilly spices. Mater Pulao is different and I don't claim that this is the same procedure. This is just my own rendition of a simple Matar Rice but is really delicious and my husband loved it.


Green Peas

Wednesday, December 29, 2010

Creamy Strawberry Salad

This Holiday Season, I prepared a delicious creamy strawberry salad. Actually I have fruit salad too but this one is another. I didn't thought that hubby would buy a Mahabaleshwar strawberries which is really tempting to eat.
Mahabaleshwar Strawberries
Photobucket

Mahabaleshwar is a famous place in India that you can harvest the best and biggest strawberries in town. The cost is not that expensive compared to the strawberries you buy in the groceries since buying this type of strawberries in the local market would mean that you can haggle the vendors for their prices.
Mahabaleshwar Strawberries in my hands
mahabaleshwar,strawberries

See how fresh are my strawberries? It was the biggest strawberries I have ever had and it was my first time to munch such a very yummy treat. Anyway, just to remind you that I have washed it first with a veggie wash before preparing it into creamy salad.

Here is what I wanted to share on Creamy Strawberry Salad:
Ingredients:
All Purpose Cream
Strawberries
Condense Milk

Method/ Preparations for Creamy Strawberry Salad:
Just mix all the ingredients given above and chill it inside the fridge. Slice the strawberries into quarters or to what you like before you mix it with the All Purpose Cream and Condense Milk. It was just so easy to prepare even your kids can help you prepare it. Best served when chilled.
Creamy Strawberry Salad
Photobucket

You can also eat this strawberries while they are with crumbled ice. Although the strawberries weren't that sweet, it just complimented on the all purpose cream and the condense milk that I have put. You can also include other fruits like pear and pearl balls if you like.
Taste test on Creamy Strawberry Salad
Photobucket

The All purpose cream was not that heavy. It was not what I really expected since I thought my creamy salad would be creamier and not juicier. But anyway, the condensed cream pulled it all together and glad hubby wasn't that choosy to eat what I gave him.
My Finish product
Photobucket

Just this morning I still have my remaining creamy strawberries in the fridge and I scoop out some and put it in our oatmeal for breakfast. It was really a good combination, very healthy and very lovely.

Tuesday, December 28, 2010

Sweets For Gift Giving

Christmas is in the air and sweets for gift giving is also possible. It was one of the best and nicest thing that a kid can enjoy and no one can resist. That is why me and hubby have decided to buy something sweet like chocolates for gift giving this Christmas.
Sweet Chocolate for a Christmas Gift
Photobucket

I like this type of chocolate which is with almond. But the thing that a buyer can be attracted when buying it was the box since you can recycle it. There are lots of goodies with promo or discounted price during this festive season. You can get the advantage when you buy a whole pack or promo pack.
Freebie Chocolates that I got when we buy Vintage Chocolates
Photobucket

Round bits of Choco with Almonds
Photobucket

You don't need to spend too much on sweets like chocolates. I was just happy that they offered the most cheapest price without sacrificing the quality of the chocolates. One of the local chocolates that I started to like was Amul Chocolates. We also bought an assorted chocolate and I cannot believe that the taste of it was similar to the most branded chocolate I like. Although the difference obviously was the price.
Amul Assorted Chocolate
Photobucket

Amul is just a local brand of Chocolate in India but it was really delicious and yummy. I like it since it is also affordable compare to other chocolates. It competes with other branded chocolates available in the market. I personally like the packaging which is presentable.

Monday, December 20, 2010

RiteBite Nutrition Bar

Ritebite Nutrition Bar is somewhat an energizer to people who are always on the go. It is a healthy snack which you can always carry along with you. I personally like to give this to hubby before he goes to work since it wasn't their style here to pack lunch and eat it. He prefers to eat hot steaming rice so I don't have anything to worry on preparing him food before going to work.

But instead, I usually gave him some snack items just like this handy chocolate bar. It comes with other flavors too if you buy it in a box which will have you a discount. I consider it healthy loaded with vitamins and minerals. But of course, there is no substitute with regards to fresh fruits. I don't mind to give him such but it was just his choice not to since he can easily pocket a bar of Rite bite rather than a banana or apple or any fruits that I can think of.

ritebite


It was not a slimming bar, but mostly an energy bar which will perk you up on your busy day. Just perfect for a very busy person who has no time for going to the cafeteria to buy some snack. Ritebite has at least offered a discount when you purchase it in box.
Goody goodness from Ritebite, A Healthy Snack
energy bar

Saturday, December 18, 2010

Beef Meat Balls

Beef Meat Balls -Today is another exciting recipe which is just so easy to prepare. Sorry for those vegetarian friends of mine since they won't be interested to try this one, but for those who aren't vegetarians at all, then this recipe is pretty simple to do. Here is the recipe I wanted to share with you.

Ingredients for Beef Meat Balls

1-medium onion (chopped into small bits)
soy sauce (knorr or maggi liquid seasoning)
1/4 kilo ground beef
salt
ground black pepper
1-egg
less than 1/4 cup of flour
vegetable oil


Preparations / Methods for Cooking Beef Meat Balls:

In a bowl, put all the ingredients except oil. Mix it all and make small balls out of the meat. You can make the balls round and defined by placing flour on your hands so that it won't get so sticky. You can actually make more than 10 meat balls out of that 1/4 kilo of minced beef.

Cooking the Meat Balls:
Heat the pan and put a lot of oil. It is important that your meat balls should swim on this one so that it can get cook faster. Remember that only put the meat balls if the oil is really hot. Just make sure that once your frying the meatballs, your flame should not be so high. I still suggest to put it on slow flame to cook the beef well. But I don't have any issues if it was on a medium flame as long as you can manage to check your meat balls if its tender enough.
Make sure to turn the sides of the meatball to cook it evenly
meatballs2


See how the meatballs swim in oil to cook them well
meatballs3


At that moment, I don't have any flour to use so I used my wheat flour. But the disadvantage of using a wheat flour on cooking meatballs was that it was so crunchy and my meatballs ended up so rough and hard. Well, I don't know if you may call it an advantage. Maybe you can throw it against your enemy, haha! Just kidding. Don't play with your food.

I used wheat flour for this one
meatballs2

Have fun cooking. You can add more on your meatballs if you wanted some spice. You can chili powder into it. But if you are not into spicy foods, then you can try putting some herbs like cilantro or oregano bits. You can experiment and you won't get it wrong as long as you like what your tongue is telling you.

Wednesday, December 15, 2010

Chicken Mushroom with Sooji Rawa

Chicken-Mushroom with Sooji Rawa - This recipe is just my own concoction as I combine chicken, mushroom and Sooji Rawa or Semolina. I was thinking about creamy mushroom delight with Chicken but since I don't have an all-purpose cream at that time, I decided to use Semolina to make something like a gravy type of sauce. It looks light and not a heavy type of creamy mushroom sauce. The trick was because I put only one cube of easy quick melt cheese to do the creamy stuff and sooji rawa to do some wonderful magic on the recipe. If you don't know anything about Sooji Rawa or where to get them, I suggest you visit a local organic store or store that sells organic foods and spices. Here is the recipe that I wanted to share with you:

Ingredients for Chicken-Mushroom with Sooji Rawa:

1/2 kilo of chicken
1- medium size onion
2-3 cloves of garlic
1 tsp. of Sooji rawa or semolina
1 pack of button mushroom
1 chicken bouillon cube (knorr or maggi)
knorr liquid seasoning (for seasoning the chicken)
salt to taste
ground blk. pepper for taste
2-3 tbsp. vegetable oil
1 cube quick melt cheese

Methods / Preparations for Chicken-Mushroom with Sooji Rawa:

Clean the chicken first and make sure you have scrub it with salt to remove the poignant smell. After this you need to put it in a pan with a small amount of water to make it tender before putting some oil to slightly fry it. Once your chicken is golden brown and ready, you can now saute garlic and then onion. Put some salt to your onion to cook it well. After this you need to put the button mushrooms and saute it together with the chicken as you sprinkle some liquid seasoning from knorr. I like this way so that it won't be so dark in color and that is why I don't use soy sauce for this recipe.

After this you can now put your chicken bouillon cube and put some ample amount of water for your chicken and mushroom to get tender. Simmer for around 3-5 minutes and check the taste. If it needs salt, just put some salt and then sprinkle some ground black pepper. Once the water is less you need to put the sooji rawa and stir it a bit so that it will spread together with the chicken and mushroom. To make the sauce a bit gravy, put the cube of quick melt cheese. Simmer for some more time and presto, your Chicken-mushroom with sooji rawa is now ready.

I just put a pinch of poppy seed here
chicken with mushroom


If you don't have poppy seeds, its just fine. The recipe will still be as delicious as this. Although I really wanted the chicken to be fried so the color looks a bit more brown but yummy for me.
You would not be able to see the Sooji Rawa or Semolina here
chicken mushroom with poppy seed

Monday, December 13, 2010

Chicken Mechado Recipe

Chicken Mechado Recipe- I was happy to cook this food for hubby since this recipe is authentic Filipino dish. It is easy to cook as long as you have the right ingredients and know the proper way of cooking it. I have learned this dish by just watching my mom how she prepares it. it may not be the exact way she cook it, but at least somehow it resembles. Here is the following ingredients for Chicken Mechado recipe:

Ingredients:
1/2 kilo of chicken ( this is just good for 2-3 persons)
2 medium sized potato
1 big green capsicum
2-3 cloves of garlic
2 medium sized onion
1-chicken bouillon cube (knorr or maggi)
soy sauce -for taste
salt- for taste
5-6 tbsp. of tomato puree/sauce
ground black pepper- for taste
2-3 tbsp. of cooking oil

Methods/ Preparations to Cook Chicken Mechado:

Wash and clean the chicken as you scrub it with rock salt. Rinse it with tap water and cut it into small to medium pieces. I suggest that you put the chicken in the pan with a little amount of water and sprinkle some salt and set the stove into medium flame. In this you are tenderizing the chicken till it squeeze out its own oil for you to start frying it. But just don't over fry your chicken. Once you see that the chicken is light brown,set the stove off and put the chicken aside.

Sauteeing the Ingredients:

Preheat the pan and put the oil. Once your oil is hot you can now put your garlic and then your onion. Since I have mentioned you needed 2 medium onions, one onion you need to slice in thicker and bigger, and the other one is for sauteeing. Put the sliced onions first and then put some salt into your onion so that it can be cook easier. When your onion is already golden brown, you can now put the potato. Make sure that your potatoes are sliced into four (crossed cut) when its a medium sized potato). You don't need to cut slice it thinly since Mechado needs more simmering to get the flavor of chicken and potato well combined.

Delicious Chicken Mechado
chicken mechado2


Once your potato is ready, you can now put your chicken, some water and put your chicken bouillon cubes and sprinkle some soy sauce ( I prefer knorr liquid seasoning) for this one, or else you can choose the Chinese soy sauce as long as you don't use the dark soya sauce from India because it was totally tinted which can destroy your Mechado looking like a Dinuguan dish.

Simmer for 2 minutes and check your water if it was just enough (not too much). Once the savor of soya and chicken bouillon is there, you can now put the green capsicum and please do not over cook them. It is better to cook it a bit crunchy. After this you can now put your tomato puree or tomato sauce and sprinkly some more salt and pepper if you think the taste needs more.

Yummy Chicken Mechado Ready to be Serve
chicken mechado1

Saturday, December 11, 2010

How to Cook Palak Paneer

Palak Paneer ( Spinach with Cottage Cheese or Tofu) is a recipe very well known and is a traditional food in India. It is a very delicious and healthy recipe good for vegetarians and health conscious people. I personally like how palak or spinach is so green before I put it in a blender and make a fine paste. Cottage cheese or tofu plays an important part to balance this recipe since palak itself is too fine and to chew something from this recipe, you need the softness of the paneer or tofu (tokwa in Tagalog). Below is the list of ingredients needed for this recipe.

Ingredients for Palak Paneer:

1 bunch of Spinach (Palak)
half tsp. of garam masala
half tsp. of cumin powder
half tsp. coriander powder
pinch of turmeric powder
half tsp. of chili powder ( if you want it more spicy, you can add more)
2-3 cloves of garlic
pinch of fenugreek leaves powder
1 tomato - chopped in small bits
one medium size onion
1 tbsp. ginger-garlic paste
2 green chillies (sliced into pieces)
salt to taste
2-3 tbsp. of oil
2 tbsp. whip cream or all purpose cream (optional)
paneer or cottage cheese(tofu)- 1 vacuum packed size

Methods/ Preparations for Cooking Palak Paneer:

Boil water and once it reaches the boiling point, put the spinach or palak in and don't cover your pot because this will get your palak darker in color and not green. Once your palak is done, set it aside or cool it down before you put it in a blender to make a fine paste. Just put ample amount of water for your own preference.


Sauteeing the ingredients:

You need to heat the oil and then put the garam masala first, then followed by cumin powder. After this you need to put the garlic cloves and then onions. Put a small amount of salt in your onion to cook it faster. After this you need to put a pinch of turmeric powder on your onion and stir it well so that it won't stick at the bottom of your pan. Put the ginger-garlic paste and next will be your tomatoes. Once your tomato is kinda mushy, put the coriander powder and then later put the chili powder and next will be the fenugreek leaves powder. After putting the fenugreek powder, add the chopped green chillies. Set this all aside and keep it cool for some time before you put it in a mixer to make a fine paste.

Cooking the Palak and the Paneer:

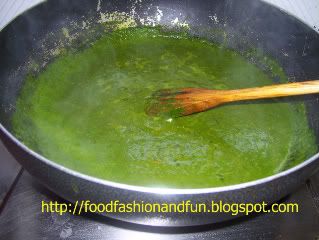
Once you have mixed into fine paste the sauteed ingredients, put some ample amount of water into it and make it boil, after this you can now add the palak paste that you set aside awhile ago and it will look like the picture below. See how the steaming goodness of palak is:

Notice How Green my Palak Is
palak paneer


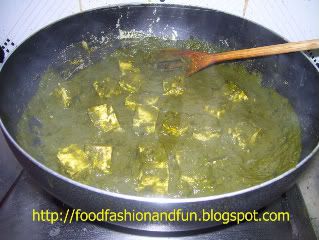
Once you see some oil on the site of your pan or wok, then you can now put your paneer or cottage cheese (tofu). Simmer for a few more minutes till your cottage cheese or paneer is tender and ready and then the last is your whip cream.

Palak Paneer is now ready to eat
cottage cheese,palak,spinach with cottage


Just make sure you cut the cottage cheese or paneer a bit bigger. You don't want your paneer crushed so avoid stirring and stirring the pan. Just put some more salt if you feel like the taste still needs more.

Friday, December 10, 2010

Rice Crispies or Kurmura Ladoo

Rice Crispies or Kurmura Ladoo is one of the most classic snack that I can think of. When I was a young kid, my grand mother used to buy me rice crispies or kurmura ladoo. This one is just created with an extra ingredient since the rice crispies that I used to eat was in a bar shaped figure and this one is round.
Kurmura Ladoo
kurmura


Kurmura ladoo is made out of shenghdana or peanut, kurmura with sugar and jaggery and they also have added some eliachi or green cardamom seed in it. It was just sweet in taste but not too sweet that you can easily get used of the taste. I really like crunchy rice crispies although it should have been easier for me to munch if it was a bar and not just round to slip my fingers when I bite it just like a child who gets her or his hand all wet with saliva when chewing or licking their candy.

Rice Crispies with peanuts and green cardamom
rice crispies,kurmura ladoo


It comes in a pack, six round pieces for an affordable price which you would really like to give for your kids. I somewhat like some snacks which is with nuts or rice or wheat. It is more healthier than a regular junk food that you buy in the grocery. Perhaps I will try how to make one, but not just now since I really do have a lot of things to catch up on my blog. Kurmura Ladoo is one of the snacks which is available all year round and you can buy it in easily in the market and groceries. Have you tried one?

Thursday, December 9, 2010

Adobong Okra

Adobong Okra (Lady Finger)

Adobo is one delicious Filipino dish which is well known. You can cook adobong manok(Chicken) or adobong baboy( pork meat) or whatever you like for an adobo be it a veggie or meat, as long as the main ingredients for adobo is there, you will surely like it. But this time, I wanted to share my own version of crunchy adobo which is dry and kinda spicy.

All you need to do is not to put too much water and put some spice like chilly powder to twist the taste. But if you don't like spicy and hot food, then just skip putting chilly powder.

Ingredients for cooking adobong okra (lady finger):

okra - sliced slantly into one inch
garlic- a lot of garlic cloves( this gives the aromatic smell of your adobo)-your preference
ground black pepper - your preference, just a few amount only
salt- for taste
soy sauce- (for those in India please don't use the dark soy sauce)
vinegar- (sugar cane vinegar and not synthetic vinegar)
2-4 tbsp. of water
vegetable oil


Preparations for Cooking Adobong Okra

Mix all the ingredients above and taste it if it was the correct spice and flavor that you like. Please take note that I didn't put an exact amount of measurement since your adobo will depend on the amount of lady finger that you have. Just to make sure, if you put let's say 5 tbsp. of soy sauce, then you need to put only 3 tbsp. of vinegar and not too much. Adobo is not a sour food. It is more of salty and blended sour but not too sour and not too much water like a soup.

Another thing that I wanted to tip here if you are cooking adobo, be sure you put a lot of oil like 5 to 7 tbsp. of oil if your measurement for soy sauce was 5 tbsp. The oil will keep your adobo cook even more and without sticking it at the bottom of the pan. Since water will not be much, expect that the oil will also fry a bit of your okra, but don't fry it too much.

Some people like their adobo sweet so they put sugar or pineapple bits into it. But that is good if your cooking meat adobo and not a veggie adobo. But again, it will still be your choice if you want it sweet.

My crunchy and spicy adobong okra (lady finger)
adobong okra

Saturday, December 4, 2010

Pointed Gourd or Potol

Pointed Gourd or Potol

This wonderful veggie I discovered when I started to live in India. We don't have this kind of vegetable in the Philippines so I am not aware of it. My mother in law used to like this kind of vegetable and when she prepared it and let me tasted it, I somewhat like it because it tasted like fried eggplant but it was more than that since it is not soft and mushy and it was not itchy to the tongue just like any other eggplant that we used to cook.

Fried Pointed Gourd


potol,patol,pointed gourd

Potol or Patol is Pointed Gourd in English. It is a vegetable which is available in India whole year round and I really like the taste of it when it was fried. It has seeds in it that determines its age. The thicker the seed the older the pointed gourd is but you can still munch that seeds if you want to eat it. Preparing this vegetable is so easy because you can fry it or you can put it along with other vegetables for curry.

Fried Potol is much easier to prepare and match other dishes

pointed gourd,food blog,patol1

If you want to prepare this veggie, just cut the tips at both ends and slice it in half vertically. Once you slice it marinate it for 15 to 20 minutes using salt, red chilly powder and turmeric powder. After that you just need to fry it for about 2-3 minutes as long as your oil is preheat.

Friday, December 3, 2010

How to Make Flat Bread (Chappati)

Chapatti or Flat Bread

Believe me up until now, I am still perfecting to make my own chapatti's shape to be round or circle. Most of the time, I ended up on elongated or something like an alien ship or flying saucer that came from outer space. Seriously I don't watch my in-laws to make it since I am thousands of miles away from them, so I just learned it on my own by watching it on youtube.

Again you don't have to be an expert to cook something. Cooking should be a passion. You should love what you are doing so that it mirrors what you prepare before you serve it to your family and beloved.

My Alien Spaceship shaped Chappati/ Roti or Flat bread

Photobucket

Chapatti is made out of wheat flour. I haven't seen anyone mix it with white flour. Just to make a sample chapatti, use two cups of wheat flour and then only 3/4 cups of water and put it in a mixer to make a dough. Keep the dough in an open container for 20 minutes before you roll it into balls which is only a coin size.

Just use a thick rolling pin to make the size more round. Use a tava or a non stick pan and don't use any oil. Once you preheat your tava or non stick pan place your rolled dough and once you see small bubbles coming in, just roll your wheat dough and press it using any clean cloth to make the chapatti balloon in size.

Spread some ghee or butter in a ready hot chapatti and keep it on a tiffin to maintain it's temperature. Chappati is always part of Indian dishes which is always good to compare with any curry recipes.

Elongated Capsicum with minced Beef

Elongated Capsicum with Minced Beef

I was able to buy minced beef and marinated it with soy sauce, salt and black ground pepper and masala. Fried it till it was crispy enough and then the next thing I did was to fry the green peppers. It was really oily and I still opted to grill the capsicum instead of frying it, but we don't have any grill so I landed on frying it.

Photobucket

It was really spattering so just be careful of placing it on hot oil for frying. What is best is that when you fry such veggie, you should have a napkin to drain the remaining oil before serving. I don't have it at the moment I prepared the dish so it looks oily as it can be when clicked on a cam.

It is good to pair it with chapatti or flat bread. Since you can wrap it like a mexican dish. Anyway, if you wanted to know how to prepare chapatti or roti, I will post a recipe here so you can start cooking and preparing your own flat bread which by the way is made out of wheat flour.

Green Capsicum with Minced Beef, Chapatti and Chicken Biryani

Photobucket

I didn't prepare that Chicken Biryani that you can see on the picture. We bought it outside to eat along with what I prepared. It was a night of relaxation and off days are meant to be special for us( hubby and I) so I paired it with this dish. It is better if you eat your green capsicum wrapped in chappatti. It was surely great since it absorbs the extra oil that was on the veggie, made perfectly for each other.

Wrap your chappati around the green capsicum to hold the minced beef inside

Photobucket

Tuesday, November 30, 2010

Chicken Egg Vs. Duck Egg

Chicken Egg or Duck Egg?

I guess you can easily distinguish what a chicken egg is from a duck egg. Not because of tasting it, but when you try to see the outward appearance of both eggs, you can definitely say, ahh! that is chicken egg or that one was duck egg.

Duck egg is said to be more nutritious than chicken egg which has more calories because it is way bigger than the chicken egg. On the other hand, both still have the same vitamins and nutrients present but chicken egg shell is thinner and easier to crack than the duck egg which gives duck egg an advantage of shelf life although if it is kept inside the fridge.

Duck Eggs Are More Costlier than Chicken Eggs but it's worth a try for a taste
Photobucket


I bought a half dozen of duck egg in the grocery and it was really expensive than ordinary chicken egg. Duck egg is expensive since it is bigger and the feed for the ducks are usually expensive than chicken feeds. Buy a duck egg with a date label and shows the expiry date and keep it inside the fridge for maintaining the quality.

Half Dozen of Duck egg costs Rs 51.00

Photobucket


Cooking a duck egg is more longer compared to boiling a regular chicken egg. The taste and smell is really different and I am sure you would not like much that your duck eggs developed into a more fertilized duck egg which can be a BALUT rather than a Penoy egg.

Filipino culture adopted the eating of duck fetuses and it does make them believe that it is more than a viagra or an aphrodisiac which is good for sex life. Call it a taboo, but it depends on your own preference if you wanted to eat such. But for me, I just prefer to eat it simple without gross. I prefer to eat a Penoy (not matured duck egg).

Which is which(Chicken or Duck Egg), where is the Duck Egg?

Photobucket

Monday, November 29, 2010

Mackerel Fish with Cauliflower

Mackerel Fish with Cauliflower

This recipe I got from my mother in law although she didn't instruct me how to cook it, but as
to what my eyes can see on how she gives this meal to us every time we go for a short vacation, I just kept thinking why not try and experiment. Now this meal is somewhat the same like the rest of the spicy foods I got since the ingredients were just the same although my preparation for fish mackerel will be different.

Ingredients:

2 pieces of mackerel fish slices into two
1/2 kilo of cauliflower
asoefitida
3 tbsp oil
red chili powder (2 tsp)
turmeric powder
onion
ginger-garlic paste
cumin powder
coriander powder
1 fish broth cubes (knorr or maggi)
2 tbsp tomato puree
salt
ground black pepper

Preparations:

Fry the fish on a separate pan and set aside. Heat the oil and put the cumin powder first and then sprinkle a bit of asoefitida. The next thing that you need to do is put the onion and put salt and a pinch of turmeric powder into it. If you see that your onion is golden brown, then put the coriander powder and the tomato puree. After this you can now put your cauliflower and then put the knorr fish broth cubes and put an ample amount of water that you desire. If your cauliflower is half cooked then you can now add the fried mackerel fish into it. Simmer for 8-10 minutes on a medium to slow flame. Taste the food, if it needs more flavor, then just add some salt and ground black pepper.

cauliflower
You don't need to let the fish swim in too much water for a soup. Just enough water to keep this dish tasty.

mackarel

Spicy Okra (Lady Finger)

Spicy Okra (Lady FInger) Recipe

Okra or lady finger is one of the cheapest and all year-round available veggie in India. Every week when we used to market, I always do include veggie in my menu and I always prepare okra or lady finger. This recipe is quite spicy to someone who is not fond of putting chili in their dish. But in India, it is just regular that chili are always present in their dish. Hope you do like this dish.

Ingredients:

1/2 kilo okra
2 tbsp. of oil
1-1 green chillies (sliced into ring pieces)
pinch of turmeric
pinch of cumin powder
pinch of coriander powder
1/2 tsp of red chili powder
1 medium onion
2-3 cloves of garlic
1/2 tsp. ginger-garlic paste
salt to taste
pinch of ground black pepper

Preparation:
Please wash your vegetables well before slicing and don't soak your okra in water when cut because that will be all gooey and slimy. Just cut it into rings as what you can see on the sample picture I have below.

Heat the pan and put the oil, then put your cumin powder, green chili and then garlic and once the garlic is ready put your onions. Just put salt while sauteing your onion to cook it well. After that you can put your turmeric powder and then your coriander powder and ginger-garlic paste. When the onion is already golden brown, then put your okra or lady finger. You can now add your chili powder and then put the flame from medium to slow flame and cover the pan to cook the veggie well. Just put only two table spoon of water and please don't put more because this recipe is good to be dry and not watery since we know that okra is slimy, so you don't need to put a lot of liquid.

spicy lady finger

Simmer the food till the lady finger gets tender and ready. Just season it with salt and ground black pepper to taste and that's it. You have your chilly and spicy okra.

okra

Wednesday, November 24, 2010

Kaju Katli Sweets

Kaju Katli is made up of cashew nuts, sugar and silver foils(which is palatable). I am not here to talk about how to make a kaju katli because I haven't prepared one but what I am just going to say on my blog is that I really like the taste of it.


This sweet is always available in India. It is always given as a gift during Diwali or festival of Lights and colors for the Hindus. We were gifted by my hubby's company and I surely like the taste of Kaju katli. Although it is really expensive when you buy this sweet because as I have said, it is made out of cashew nuts.


kaju

Kaju Katli is coated in silver foils. I don't know if there are any other color to coat it with but the one I had was silver foil coated but not thoroughly coated like the ones that we consumed during Diwali. By the way the prices of Kaju Katli in the market was Rs500+ for one kilo. What I have as a sample her was just 200+ grams of kaju katli that we bought at Hypercity grocery. It was around Rs102 for that small box, I just didn't count how many pieces are in there since I already ate some.


It is nice to gift someone something sweet and tasty like kaju katli. You can definitely feel you are loved and special ones a person gives this to you. I don't know but I really do appreciate the taste of their sweets here (selected) as I may say.

kaju katli

Bitter Gourd Sauteed with Egg

Bitter gourd or bitter melon (ampalaya in Tagalog) is one of the most less like veggies and kids even hate it. I cannot blame them because it is really bitter but it has good nutritional values and it is also good in our body particularly our blood.

I do like bitter gourd ever since I was a kid. My grandmother and my mother always prepare this dish wonderfully and I really do like how they prepare it. Sometimes my grandma used to saute it with sotanghon (bean thread noodle) and sometimes my mom would include bitter gourd with beef. But today what I wanted to share with you is a simple recipe which will take you only 10-15 minutes of cooking. Here are the following ingredients.

Ingredients:
2 tsp. oil
1 egg (beat the egg)
1 tomato (sliced in small cubes)
1 green chili
medium sized onion
2-3 cloves of garlic
a pinch of turmeric powder
salt to taste

Instruction:
First you need to heat the oil in a pan and then saute your green chili with garlic and once your garlic is ready place the onion and put enough salt to cook the onion faster. After this you need to put the turmeric powder and then add your tomato. Once you see the tomatoes already mushy, put the beaten egg and set this aside.

For sauteed Bitter gourd:
2 tbsp. oil
1 medium size bitter gourd (already chopped)
medium sized onion
pinch of cumin powder
pinch of turmeric powder
salt to taste
ground black pepper (to taste)

Instruction:


Heat the oil and put the cumin powder and onion. Put some salt to your onion so that it can cook the onion faster. Then put the turmeric powder and once the color was already blended in, put the bitter gourd. Please do not add water, keep the flame on a slow to medium heat to cook the veggie. But if you wanted some sauce, just put two tablespoons of water to your bitter gourd. If the veggie is half cooked, you can now put the sauteed egg you set aside earlier. Simmer for 2 more minutes and then add some ground black pepper and some more salt depending on your taste. By the way, you can put soy sauce for this recipe just in case you don't like a plain salt for the taste. But just don't overcook your veggie.


Here is the Sample Photo of the Bitter gourd that I have cooked
bittermelon


I have my chappati or roti on the side of the Bitter Gourd

bittergourd


See how still green my bitter gourd is? Just don't over cook when preparing a vegetable meal.

Monday, November 22, 2010

Eggless Cakes for your Health

Eggless Cake at Monginis

Some of us are vegetarians and prefer to buy and eat food without meat and eggs. This is one bakeshop that I have discovered that offers eggless cakes and pastries. It can also be good if you are really strict on dieting and losing all those calories and just can’t help but to diet. Eggless cakes can also be considered healthy for people who really wanted to cut off that cholesterol in their diet.
Eggless cakes are usually the same taste like any other cakes with eggs but the sweetness is really tolerated. I can say that one slice can never get you used of the taste because it was just created not to be too sweet. I do like the cakes served at Monginis cake stores which I think is the leading cake supplier in India, a place where most of the communities are vegetarians.


Heart-shaped Eggless Cake for Hubby’s Bday
eggless cake


But certainly I haven’t seen any type of fondant cake around, mostly are boiled icing and if you are a patissier, you will also say the same thing. By the way, I am not a patissier by profession, I am just a regular customer buying cakes and pastries and I tend to compare most of what I get from different stores and bakeshop. I always go for the quality and at the same time the price which can be affordable and not too much to make a hole out of my pocket.


Eggless cakes are not that sweet
heart shape cake,eggless


I used to remember sweet pastries and delightful delicacies back home and I can never find it here to where I am. But there are things that I can say I really discover when different application is applied due to culture and belief. Although even if they don’t use eggs in most of their cakes here, I still find the prices a bit pricey when I try to compare those delicious cakes I have back home which is of course, you might say “sinful” because it was lavishly designed for you to get fat but the price was really cheaper.
The texture of the cake is not the same with what I have from the past (cakes from my country) probably because of how the cake has been made. It does lack fluffiness and some x factor or ingredient that I am looking for which does not condense my thought. I don’t know if it was just my palate but certainly if you wanted eggless cakes, they are good for health, but if you want it sweeter, fluffier and truly captivating, try the ones with eggs. It’s your choice, which one should you select?

Sunday, November 21, 2010

Do You Use a Vegetable and Fruit Wash?

Do you use a veggie wash? If yes, how often and what do you use to wash away those chemically treated fruits and veggies? It is just normal for us to wash our fruits and veggies before eating and cooking it but do you really think that the chemicals are technically gone when you wash them off with just tap water. It is important to keep our family safe by preparing them healthy and fresh foods. For me I never give any fruits to my family without cleansing the fruits on veggie wash.
I only trust one vegetable and fruit wash which is organic and safe to use. It does not contain any harsh chemicals and is really proven effective on washing off those chemicals, dust and dirt that was present in our fruits and vegetables.

Fruits Soaked in Tiens Veggie Wash

veggie wash,fruits soaked


When we go to local market, we always see flies swarming around those sweetened and ripe fruits. So it is also advised to wash those fruits and vegetables carefully because we never know if there were also eggs that were implanted on the leaves, barks, stem of our fruits and veggies.
I only trust to use Tiens Vegetable wash because it is organic and safe to use and proven to keep the fruits and veggies fresh and crispy. All I do is just put an ample amount of veggie wash into water and then shake the tap water to make it bubbly. By the way, it is not soapy or bitter in taste. I can actually dip my finger and taste it and there was nothing in Tiens Veggie wash.
I soak my fruits and vegetables into the wash basin for about 15-20 minutes. I like how the fruits smells whenever I soak them in Tiens vegetable wash, their scent seems to mesmerize you more. It is like it got amplified when you soak them into the veggie wash.
While the vegetables, I do notice that they are crisp and clean and so firm from their twigs to leaves and stems. You can also notice that if your veggie was already soft and withered, try Tiens Veggie wash and the leaves will stand up like a miracle. You can just ask a Tiens distributor for that which only costs around Php275 (Philippine peso) on their 500ml bottle which is really a saver because you can use it for more than 6 months depending on your usage.


Fruits become so crispy and veggies so clean after soaking it on a veggie wash
Tiens veggie wash,fruits


Tips on using Tiens veggie wash:
After soaking your favorite fruits and vegetables, keep the water because you can use it to clean your jewelries and mind you, jewelries really sparkle like new.
You can also use the soaked water of veggie wash and use it on your plants. This will help your plants grow bigger and healthier.
Note: I’m not talking about any other veggie wash, because I don’t know what they can do. I only attest what Tiens veggie wash can do since I have already experience the result. This is not also to promote the product since I am just stating my own opinion as a customer, user and my review about the product and the advantage of using vegetable wash for cleaning fruits and veggies. I also have nothing against other veggie wash in the market. We are all free to select what product is for us.

Brown Eggs Or White Eggs which is better?

Brown Egg Vs. White Egg

I bought brown eggs yesterday in order for me to serve our breakfast and to try it as a facial mask. I have heard a lot about organic eggs which are healthier and better as an alternative to white shelled color of eggs. But to my dismay, when I browse some information on the site about brown shelled color of eggs, it does not give any big advantage whether the brown eggs are healthier. Both eggs are just the same in nutritional value even if nutritionist would mention that brown eggs are better because the care and nurture for the chickens are much more given an expensive feeding rather than those regular eggs.
If you are a practical person, you would not mind buying those regular white shelled color of eggs. These brown eggs are twice the price because we bought it at Rs44.00 on half a dozen which is equivalent to $1.07. But if I have chosen the white shelled color of egg, it will only be Rs24 or $0.58 cents only. I was just curious to experience what the yolk would be like or what the consistency of the egg is.

brown egg,organic egg

Here is what I have found; the brown egg is not that smelly compared to the regular white egg. There was a ropey white strand telling me that the eggs we bought are really fresh and in good condition. Although the taste for me would just be the same like the regular egg but the only thing I praise for the brown egg is really good for facial mask.
Now I know, which is better to select for a particular purpose. If you really are on a budget, then just consider buying a regular one. But if you are peculiar on your egg white facial mask to use on your face, then nothing beats brown eggs.

brown eggs


A tip for you:
Recipes for brown eggs: fried, sunny side up, pouched egg, boiled egg, leche flan and a whole lot more

Facial Egg White Mask: Just separate the egg yolk from the egg white. Use only the egg white for your face. Apply a thin layer on the first application then dry it up for 10 minutes, then apply the second coating on your face and leave it for 5 to 10 minutes then rinse it off with your favorite facial wash or soap. You will notice that your skin is firmer and younger looking if you continue this religiously.

Subscribe via email